
Tuesday, March 27, 2012
Card Challenge!
Today, I finished a special card as an entry to a challenge given on one of my favorite sites. The challenge was to come up with a "shaped card" (anything other than a normal card shape...ie rectangle, square, etc) and then to use a stamp set put out by this company. Well, I LOVE a challenge, so I looked through the stamps I have, and found a beautiful set called "I am the vine" - which is based on the Bible verse John 15:5. I cut the card to match the shape of one of the leaves on the vine, and used a Spellbinders die to cut out and frame the verse on the center of the card. I used the vine to put a pattern on the front, and added a couple of chipboard swirls that I painted to match before adding a layer of Rock Candy Distress Crackle paint. And last...a big pretty sparkly matching bow. All I can say is....I hope THEY like it...I'm rather proud of it, actually!!! Thanks for looking and have a wonderful day!!
 ...by the way - I think the HARDEST part for me, was trying to find a good way to take a picture of this thing! Boy am I learning things by leaps and bounds!!!
Friday, March 23, 2012
Rose Tutorial (Part 2)
Wow...who knew there was a limit on how long these blot posts can be? Well, after asking my son to make sure this WAS the problem...my only solution is just to do this tutorial in two parts...so....here is part two!!
After you have rolled up your rose die, decide how tight and/or loose you want your flower to be. You will be applying glue to the bottom round portion of the die (the part you didn't roll up!) You can use a variety of adhesives for this, but I think that hot glue is probably the best. It's sets immediately, and for these flowers, that's what you want.


Once your flower is all glued down, take either your fingers or the handle of a small paintbrush and curl the petals so that the rose has a more natural shape.
 The only thing left to do now is decide how you want to display it! I used another Spellbinders die (foliage) and cut some leaves out of a sheet of vintage paper. Decide how you want them placed and just glue them down. Depending on the paper you use, these flowers can take on any look you desire. They are really beautiful! So...if you are just starting your Spellbinders collection, or if you have been collecting for awhile, but don't yet have these flowers, this is a die that you will use over and over and over again! I hope this tutorial has been helpful...it sure has been a learning experience for me!!! See you soon!!


After you have rolled up your rose die, decide how tight and/or loose you want your flower to be. You will be applying glue to the bottom round portion of the die (the part you didn't roll up!) You can use a variety of adhesives for this, but I think that hot glue is probably the best. It's sets immediately, and for these flowers, that's what you want.


Once your flower is all glued down, take either your fingers or the handle of a small paintbrush and curl the petals so that the rose has a more natural shape.


Rose Tutorial
Ok, so I am a day late here...I always forget that on Thursdays we have our PULSE group here and that always means making sure that the house is clean....and all that. So I had absolutely no time to finish this...although I did take most of the pictures (well...the ones I could take myself)
Anyway....I have been absolutely going crazy for this lovely flower die from Spellbinders, and when you add it with other lovely things...the end result is really pretty, and so I wanted to show you what I did, and how I did it!
First...and probably most important are the supplies!!! You will need: A piece of Tim Holtz Kraft Glassine paper (this comes in a pad of 36 sheets already cut to the proper size) and the Spiral Blossom 1 die from Spellbinders.
 Next, you will also need a background stamp (mine is an old French Script stamp that I have from my old Stampin' Up days), some archival ink from Ranger (I used black, but the coffee color would also work) You probably could also use Stazon Ink instead, if that is all you have...but I happen to LOVE the Archival Ink...it stamps beautifully on everything! Last but certainly not least, one or two colors of Perfect Pearls from Ranger, (or any other brand of mica powders) The colors I used are Heirloom Gold and Cappuccino. You can use either a fluffy brush to apply them OR just your fingers....

Ok,,,,step one -
Ink up your background stamp with your oil based ink, and cover the piece of Kraft Glassine completely.
 After you have stamped the paper (and this is important) you will need to heat set the ink onto the paper with your embossing gun. The Glassine paper has a wax like finish, and when you apply the heat you will notice that the paper takes on a "wet look" ...this is what you want. The paper returns to it's original look after it cools down. If you don't see the "wet look" on your glassine paper, your ink is NOT YET HEAT SET - it will smear, so make sure to hold your tool over the paper until it looks darker and wet.
 Next, open your Perfect Pearls, and with a brush, OR with your finger (I used both) apply the mica powder randomly over your paper. You don't want to totally cover your paper with the mica - just here and there to give it a pretty metallic shine!
 Again, after you have applied the mica, you must once again heat set the Perfect Pearls with a heat gun. Those of you who have used Perfect Pearls before know that there is a binder in these mica powders that is activated with a spritz of water. Well, because of the wax-like nature of the glassine paper, you do not need to spritz the Perfect Pearls with water. When you heat set the paper (again, as before - make sure you see the "wet look") your Perfect Pearls are totally set and will not rub off.,
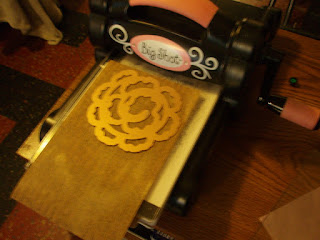
 Now take your Spiral Blossom 1 die from Spellbinders, and with your die cutting machine (pretty much any will work - I used a Big Shot, but I could have also used a Cuttlebug) cut out your flowers. You will be able to cut out two flowers from each sheet of the glassine paper. If you want to emboss the dies you can...but for this, I didn't....
 Since you want to see the stamped image of your flower, when you pick it up, make sure that the stamped side is UP. Now you need to start rolling! You don't have to use anything, but I find it easier to use the handle of a thin paint brush or maybe even a quilling tool. begin rolling the flower, design in...
 Once you get it going, you can take it off the paint brush and just continue rolling. Make sure that the bottom portion stays even as you roll..

Anyway....I have been absolutely going crazy for this lovely flower die from Spellbinders, and when you add it with other lovely things...the end result is really pretty, and so I wanted to show you what I did, and how I did it!
First...and probably most important are the supplies!!! You will need: A piece of Tim Holtz Kraft Glassine paper (this comes in a pad of 36 sheets already cut to the proper size) and the Spiral Blossom 1 die from Spellbinders.


Ok,,,,step one -
Ink up your background stamp with your oil based ink, and cover the piece of Kraft Glassine completely.


Wednesday, March 21, 2012
Steampunk and Distress!!!
Sooo...the craziness of my daughter's baby shower is finally past, and I think I have managed to catch up on all the sleep I lost while preparing for the festivities. I wanted to take a minute (or two) and share a couple of cards with you, because I am so proud of them! Recently, I made a similar card to thank a friend, and remembered to take a picture of it (as you do!) so that I could post it here...well....as it turned out, something went wrong with my camera, and the pics that I took all mysteriously vanished into cyberspace. I was VERY upset, but, things have a way of working out, and I made the card again (with a few changes and tweaks) and I love this card even more than the first.
 I kinda went Tim Holtz crazy here...I used the "Gadget Gears" die (cut them out of thin cork and distressed the edges) I tore a piece of vintage text paper and layered it over a piece of cardstock that I sprayed with Moonshadow Mist from Lindys Stamp Gang ( Burnished Brass first and then daubed over with Cattail Copper brown. I LOVE the way these two colors look together...you almost get a greenish cast to the finished product! I ran this sprayed piece through my Distressed lines Cuttlebug Embossing folder before I stuck it on the card.) Of course, with a Steampunk card you HAVE to use guys in top hats, right? This is a favorite Tim Holtz stamp - and if you look closely, I put a very, very small rosebud in the lapel of the guy in the middle! The sentiment stamps are also Tim Holtz, and the brass colored metal embellishments are pieces that I have had sitting around here for a long, LONG time!! But....I have found lately that a card isn't really finished until you make the inside as cool as the front...

So...here is the inside. More layering, more distressing...more Tim Holtz stamps. My family laughs at me, because I told my dad that if you took all of my artistry, squashed it up into a small ball and shoved me into a guy....I would be Tim Holtz! And I hope that he would find this a compliment...(hope...hope....hope)
Before I'm done here, let me share one more card that I made at the same time - (I was on a Tim Holtz roll)
 I used another Tim Holtz die on this one, the "Weathered Clock" (got this one for Christmas...thanks Dad!!)
I also used another die that I LOVE to make the flowers, the Spellbinders Floral Die 1 - (and the foliage die as well) You can do so much with these dies. Hopefully, tomorrow, (got my fingers crossed) I will attempt to do a tutorial (pictoral, NOT video - I can only take one baby step at a time!). I want to show you how to make these beautiful roses out of distress kraft glassine paper - they look so gorgeous!
Well, I hope that you have enjoyed these cards...if you have any questions about how to do any of the techniques, please comment and I will be glad to help. This whole "blog thing" is becoming so much fun...I just hope that others will enjoy it as much as I am! God Bless, and have a wonderful night!!


So...here is the inside. More layering, more distressing...more Tim Holtz stamps. My family laughs at me, because I told my dad that if you took all of my artistry, squashed it up into a small ball and shoved me into a guy....I would be Tim Holtz! And I hope that he would find this a compliment...(hope...hope....hope)
Before I'm done here, let me share one more card that I made at the same time - (I was on a Tim Holtz roll)

I also used another die that I LOVE to make the flowers, the Spellbinders Floral Die 1 - (and the foliage die as well) You can do so much with these dies. Hopefully, tomorrow, (got my fingers crossed) I will attempt to do a tutorial (pictoral, NOT video - I can only take one baby step at a time!). I want to show you how to make these beautiful roses out of distress kraft glassine paper - they look so gorgeous!
Well, I hope that you have enjoyed these cards...if you have any questions about how to do any of the techniques, please comment and I will be glad to help. This whole "blog thing" is becoming so much fun...I just hope that others will enjoy it as much as I am! God Bless, and have a wonderful night!!
Tuesday, March 13, 2012
Babies on the brain...
This Saturday is a very VERY special day! Yes...I KNOW that it is St. Patricks Day, but it is also the day of my daughter's baby shower. I can't believe that next month (cross my fingers and pray) I will be a grandmother! And of course, for us artsy types this ALSO means decorations! So allow me to share with you a part of the "table decoration" that we will have at the shower...I will try (remember, I am new at this) to share some other pics of the decor after the shower is over! Here they are....my polymer clay BABIES!!
 I'm not sure why, but when I took these little guys out of the oven, the clay I used for the skin had "baked" into a rainbow of multiculturalism. Maybe some of the clay I used was older...because it didn't seem to affect the other parts.... Anyway, these little guys will be a part of the centerpieces for the shower.
Now that I am starting to get the hang of this...later today (hopefully) I will attempt to post some pics of the cards that I just finished to apply for a position on a design team....sigh...I can dream, can't I? (of course I can...dream, and work really REALLY hard!) Hope you all have enjoyed these little ones! I sure had fun making them!

Now that I am starting to get the hang of this...later today (hopefully) I will attempt to post some pics of the cards that I just finished to apply for a position on a design team....sigh...I can dream, can't I? (of course I can...dream, and work really REALLY hard!) Hope you all have enjoyed these little ones! I sure had fun making them!
Thursday, March 1, 2012
In memory of a true patriot
A wonderful man and a true patriot passed away today. Andrew Brietbart was a true conservative warrior who had the strength and courage to stand up to the powers that be and unveil corruption. His passing, at only 43 years old, makes me realize just how fragile our lives are...and that we always need to be ready for the Lord to call us home. Please pray for Mr. Brietbart's family, his wife and four children. It also might be a good time to make sure that if the Lord suddenly decided to call YOU home...would you be ready to go? If you don't know for sure, take a cyber-detour to www.livingwaters.com, a wonderful site that will help you to make sure you will be heaven-bound. Thank you Mr. Brietbart...you will be truly missed.
Subscribe to:
Posts (Atom)